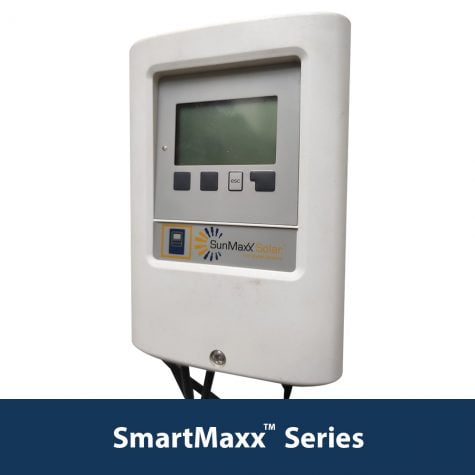

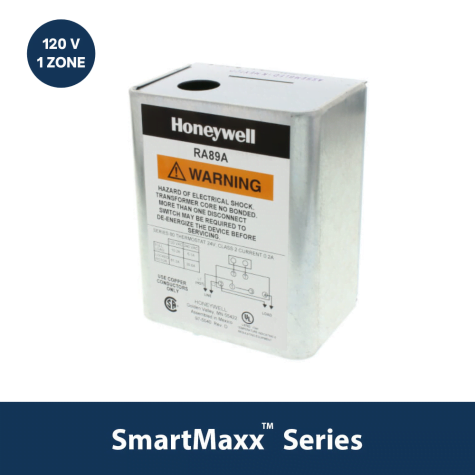
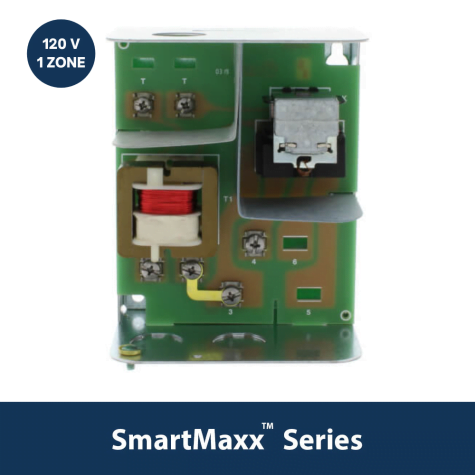
SmartMaxx™ Solar Hot Water Controller for Domestic Hot Water & Space Heating with 3 Relays
$503.99
SunMaxx Solar presents their premium solar hot water controller, an ideal solution for 95% of solar hot water systems. Made in Germany, this controller offers easy programming and a quick setup wizard, allowing you to get up and running in just 5 minutes. It features three relays to control multiple pump and control circuits, with a convenient mounting bracket on the back. The controller has a reliable relay rating of 2A (up to 4A with fuse change). Trust SunMaxx Solar for efficient and dependable control of your hot water system.
- Description
Description
SmartMaxx™-Pro Controller Series
SunMaxx Solar provides pre-packaged solar hot water heating systems suitable for both professional installers and DIY customers. Our systems come complete with all the necessary primary components for a seamless installation process. Our priority is to make renewable energy products more accessible to the community by keeping our product costs low. With our affordable pricing, you can now invest in renewable energy for your home or business without breaking the bank.
Easy to mount & install
The Solar Hot Water Controller from SmartMaxx is a reliable and easy-to-use controller that helps to get the most out of your solar hot water systems. It is designed to be simple to install and use, and includes a convenient built-in mounting housing that allows you to mount it to a wall or other surface.
This controller provides intuitive and accurate control of your solar hot water systems. It allows you to set your desired temperature and then automatically adjusts the operation of the system to maintain it. This ensures that your system is always running in the most efficient way and that the temperature of the water is always kept at an optimum level.
The Solar Hot Water Controller also features a number of safety features. It will shut down the system if the temperature of the water becomes too hot, too cold, or when the system is left inactive. This prevents any potential damage to the system and helps to keep your hot water system running optimally.
Overall, the Solar Hot Water Controller from SmartMaxx is an easy to use and reliable piece of equipment that can help you get the most out of your solar hot water system. Thanks to its built-in safety features, installation and operation are simple and reliable, making it the perfect choice for anyone looking to maximize their energy efficiency.

Universal with Muli Relays
The Solar Hot Water Controller is a universal product suitable for both commercial and residential applications. This product includes three switch relays, making it compatible with any existing solar hot water system. For optimal use, consult the comprehensive manual for all pre-programmed designs.
This product is designed for easy installation, featuring a user-friendly interface that does not require any special programming knowledge or expertise. This controller monitors the temperature of your solar hot water system and helps you to manage the use of energy efficiently.
It can be used to control the same or multiple hot water systems, making it suitable for both large and small facilities. With this controller, you can save time and money by increasing the efficiency of your hot water system.
The Solar Hot Water Controller is the perfect solution to regulate the temperature of your solar hot water system. With its easy-to-use interface and pre-programmed designs, you can make sure that your solar hot water system is operating optimally, saving you both time and money in the long run.

Features & Benefits
- Self-explanatory full text menus for quick understanding
- Wiring terminals for up to 6 sensors (PT1000)
- Conforms to CAN/CSA E60730-2-9-1 (R2007)
- Ideal for small commercial and large residential solar hot water and heating systems
- Full Graphical display
- Standard SmartMaxx Pro L4 max. amperage is 2A.
- The product version can be updated to 4A if needed
Technical Details
Specifications:
- Mains Voltage: 100 – 240 VAC
- Mains Frequency: 50 – 60 Hz
- Power Consumption: 0.5 – 2.5 W
- Controller Max. Amperage: 2 or 4 A
- Overall Dimensions: 6.42 x 4.33 x 2.04 in
- Aperture Installation Dimensions: 6.18 x 4.17 x 1.22 in
- Display: Full Graphical / 128 x 64 dot
- Network Connections: CAN Bus
- Real Time Clock: RTC / 24hr Power Reserve
- Temperature for operation: 32 – 104 °F
- Temperature for transport / storage: 32 – 140 °F
- Air Humidity for operation (@77°F): 85%
- Mains Voltage: This refers to the range of input voltage that the device can handle from the power outlet it’s connected to. In this case, the device can accept an input voltage of 100-240 volts AC.
- Mains Frequency: This refers to the frequency of the alternating current (AC) power supply that the device can handle. The device is designed to work with a frequency of 50-60 Hz.
- Power Consumption: This refers to the amount of power the device will use while it’s in operation. The range provided, 0.5-2.5 watts, is the expected power consumption of the device when it’s in use.
- Controller Max. Amperage: This is the maximum current that the controller can handle. The specification provides two options: either 2 or 4 amps.
- Overall Dimensions: This is the physical size of the device. The dimensions provided, 6.42 x 4.33 x 2.04 in, specify the length, width, and height of the device.
- Aperture Installation Dimensions: This is the size of the opening in which the device will be installed. The dimensions provided, 6.18 x 4.17 x 1.22 in, specify the length, width, and depth of the opening.
- Display: This refers to the type of display used by the device. The specification provides two pieces of information: the display is full graphical and has a resolution of 128 x 64 dots.
- Network Connections: This refers to the type of network connection used by the device. The specification indicates that the device uses a CAN Bus connection.
- Real Time Clock: This refers to the device’s ability to keep track of time. The specification indicates that the device has a Real Time Clock (RTC) with a 24-hour power reserve.
- Temperature for operation: This refers to the range of temperatures in which the device is designed to function properly. The device can operate within a range of 32-104°F.
- Temperature for transport / storage: This refers to the range of temperatures in which the device can be safely transported or stored without damage. The device can be transported or stored within a range of 32-140°F.
- Air Humidity for operation (@77°F): This refers to the range of air humidity levels in which the device is designed to operate properly when the temperature is 77°F. The device is designed to operate properly with an air humidity level of up to 85%.
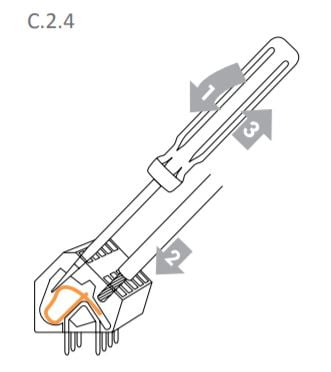
Before you start making it on your own, please read the 3 easy steps, which can help to understand it.
Step 1 – Insert screwdriver into the upper hole. Push the lock clamp inside down. Keep the screwdriver in this position.
Step 2 – Insert wire/cable into the lower opening
Step 3 – Remove screwdriver. The clamp will lock the cable.
learning this prevent form damaging and incorrect wire/cable connection to the controller.
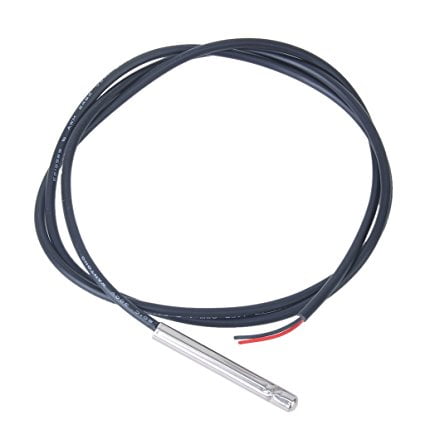
In the controller there are five possible slots (S1 to S5), where the temperature sensor can be connected. Every slot can be used for a single temperature sensor and usually S1 is used for bank of solar collector. Moreover there is a possibility to connect VFS sensors, which are usually mounted on Domestic Water Skid and Solar Pump Skid. These sensors measure water temperature and flow rate. Operational value of voltage is 12 V AC/DC applicable and suitable for all this connection in the solar controller..
There is a possibility to buy an additional accessories like DataLogger which is collecting the most important data during controller working time. It is useful accessory which can help to optimize the whole system. Remember that you have to buy a USB Power for DataLogger, that it is not included in the package for more details please contact the engineering team.
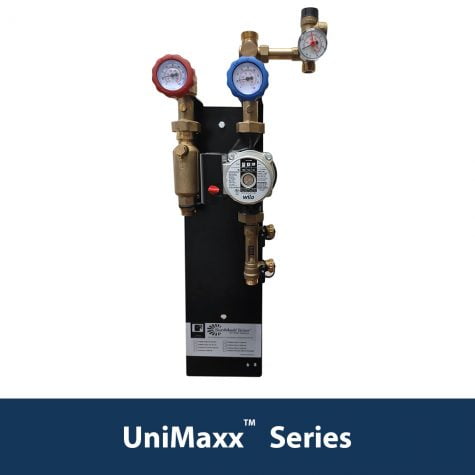
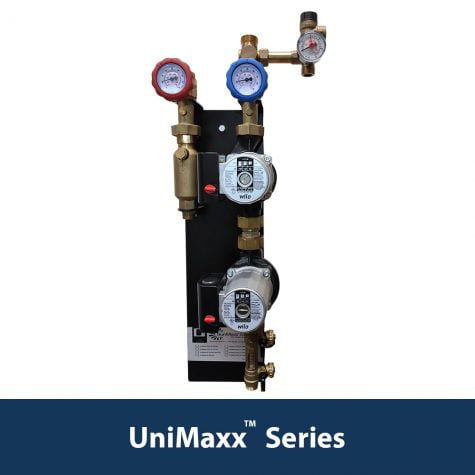
SunMaxx’s Pump Stations are an all in one solar hot water component featuring a circulator pump, a digital controller and valves engineered to keep your system circulating the solar heat transfer fluid through the collectors and into the storage tank.
SunMaxx will size a pump station specific to your needs. No need to do the math!!!
Our pump station’s fill valve has GHT hose threads on the outside. You can easily make an adaptor using the following three fittings, which can be purchased at your local hardware store or plumbing supply.
- Schrader valve x ¼” male NPT
- Reducing Bushing, ½” NPT Male x ¼” NPT Female
- Hose fitting, ½” NPT male x ¾” swivel GHT female
Use Teflon tape on the NPT threads of the Schrader valve and bushing in constructing the adaptor. When attaching the adaptor to the pump station, be sure to use two tools: one to hold the fill valve in place, and one to tighten the adaptor. That way, you won’t create leaks in the pump station itself while testing.
Take a deep breath and let all your air out… of your Solar thermal system One of the biggest issues with a successful commissioning is air removal. Any time you spend with this detail will be time well spent. Air pockets become entrained within your HTF and like to find places to hide. Air pockets can form between your HTF and the inner wall of piping (especially with flexible piping) and can only be removed through persistence and time. Here are a few things you can do to help this process. First, be sure that your air purger is located on the high and hot side of your collector series. The hotter the fluid the less the ability for dissolved gasses to stay in solution and the higher the air vent, the more likely you will effectively remove trapped air that, due to its buoyancy, will rise to the top. Once you feel most of the air has been removed this way, you can shut that air eliminator off or remove it all together. If you install a Titan Power Plus collector, you will have a manual air bleeder permanently installed in your line set connections. If you install a ThermoPower collector, you will include an air vent that should be isolated and de-commissioned at this point. Now, down to the pump station. The UniMaxx pump stations have an integral air eliminator with a scoop that will allow entrained air to collect and be bled off manually by opening the valve up to a full turn until HTF comes out. This can be done each day for the first few days or periodically checked. Smaller systems will take much less time removing the air. Another way of enabling the removal of air is to run the pump at maximum speed during commissioning, this will help to break the friction that holds the bubbles to the inner wall thus forcing the bubble through and out. After words, you should adjust your pump speed accordingly. If air persists in your system, it will inevitably find its way to the suction side of your pump and cause cavitation and eventual pump failure. If your pump appears to be not pumping, it is likely that although it is receiving 115v, it cannot pump because of air pockets. Simply unplug your pump and manual override and give it a few minutes. Air will work its way out, pump can run and then you need to go back to the air purging steps. Please view our SunMaxx technical manual (linked) for further instruction in effective system commissioning.
To check the temperature sensor you can use the digital multimeter tool and check the resistance of the sensor.
A simple steps which allow to check the temperature sensor:
- Turn the system off (electricity) – safety us the most important
- Open the controller box
- Check if the connection is not loose
- If loose fix the connection by pushing the sensor wire inside the terminal
- Close the controller box and check if that fixed the issue
- Check the sensor wire resistance with multimeter (turn the multimeter switch to the resistance measurement) – reading should be around 1.101 kOhm at room temperature and around 1.250 kOhm for hot water
- If readings are different sensor might need replacement
This short advice should help you to solve the problem.
The SmartMaxx™ controllers work similar like thermistors but there is a little difference in the way of measuring the temperature. The Pt1000 sensors (type of sensor which are using our systems) are also called RTDs. The resistance temperature probe is based on the resistance of metal in our case Platinum. The resistance of this metal depends on the temperature. Basically there are two types of thermistors PTC (the resistance is increasing due to temperature growth) and NTC (an increase in temperature causes the resistance to decrease) – the value of resistance depends on temperature. These type of sensors are more sensitive than basic type of controllers.
Available Solar Controllers
SmartMaxx Datalogger


SmartMaxx Connect Accessories


SmartMaxx Accessories


How to Order:
If you are confident with your solar hot water heating requirements you can place your order online by clicking on the add to cart button which is located above. All orders are reviewed by our solar hot water heating department and the customers are contacted in order to ensure that you have ordered the correct merchandise for your application. In the event you have any questions our sales staff are available from 8:30AM to 5:30PM EST.
Silicon Solar Inc ships products internationally please ask your sales representative for a shipping rate to your destination.
Need Assistance?
If you have questions need help or simply feel uncomfortable placing your order online feel free to contact the product representative at 1-800-786-0329.