Frequently Asked Questions
- Show All
- Commissioning
- ConnectMaxx Solar Mounting Systems
- Evacuated Tube Collectors
- FAQS
- Flat Plate Accessories
- Flat Plate Collectors
- FlowMaxx Solar Hot Water Piping Systems
- FlowMaxx Solar Piping
- Introduction to Solar Hot Water
- Maintenance
- Product Videos
- SHW Repair & Troubleshooting
- SmartMaxx Solar Hot Water Controllers
- Solar Hot Water System Design
- Solar Thermal Certifications
- Solar Thermal Incentives
- Solar Thermal Troubleshooting
- Solar Thermal Webinars
- StorMaxx Solar Hot Water Tanks
- ThermoPower Evacuated Tube Collectors
- TitanPower Flat Plate Collectors
- UniMaxx Solar Pump Stations
- UniMaxx Solar Pumps & Stations
- XMaxx Solar Hot Water Accessories
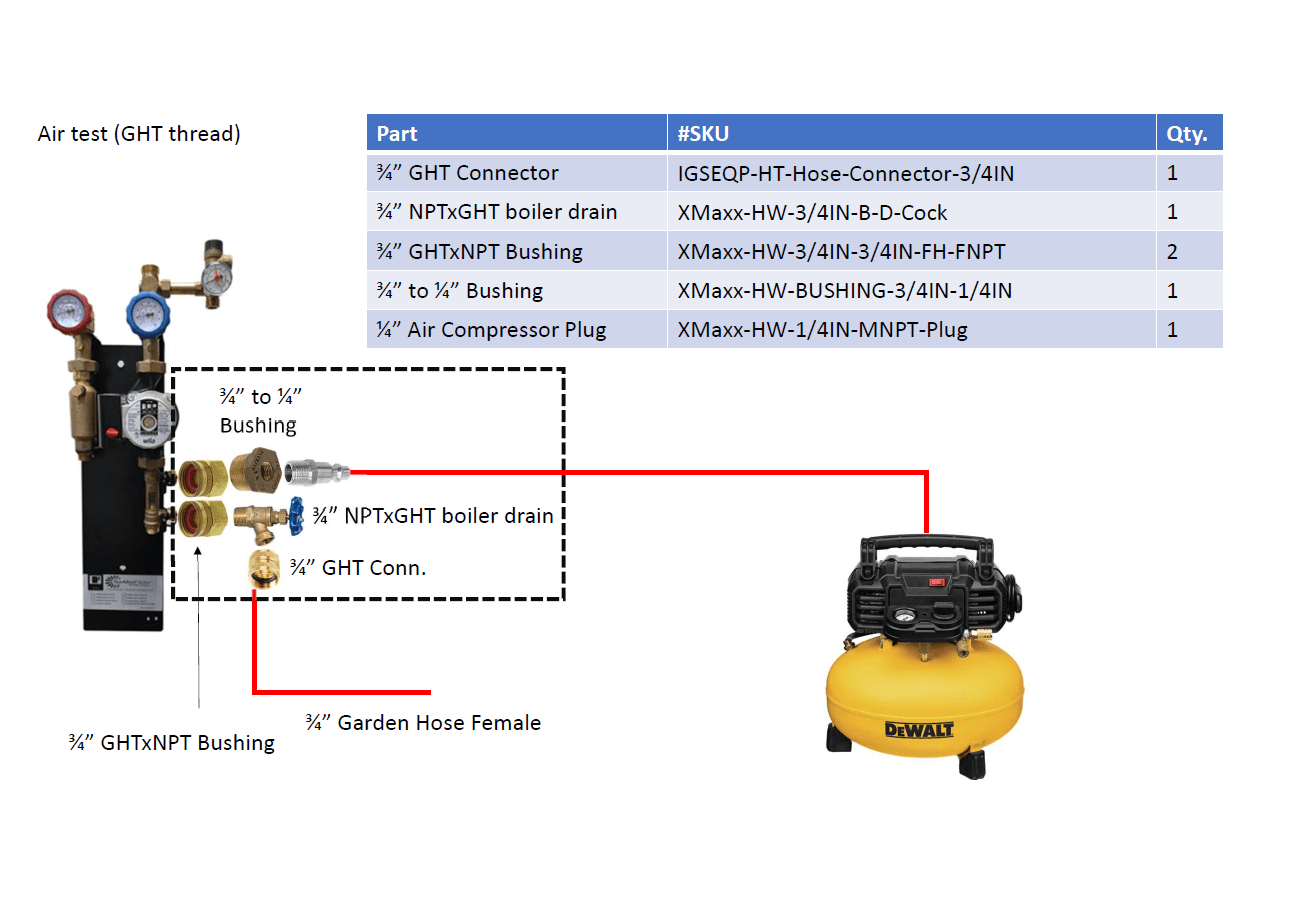
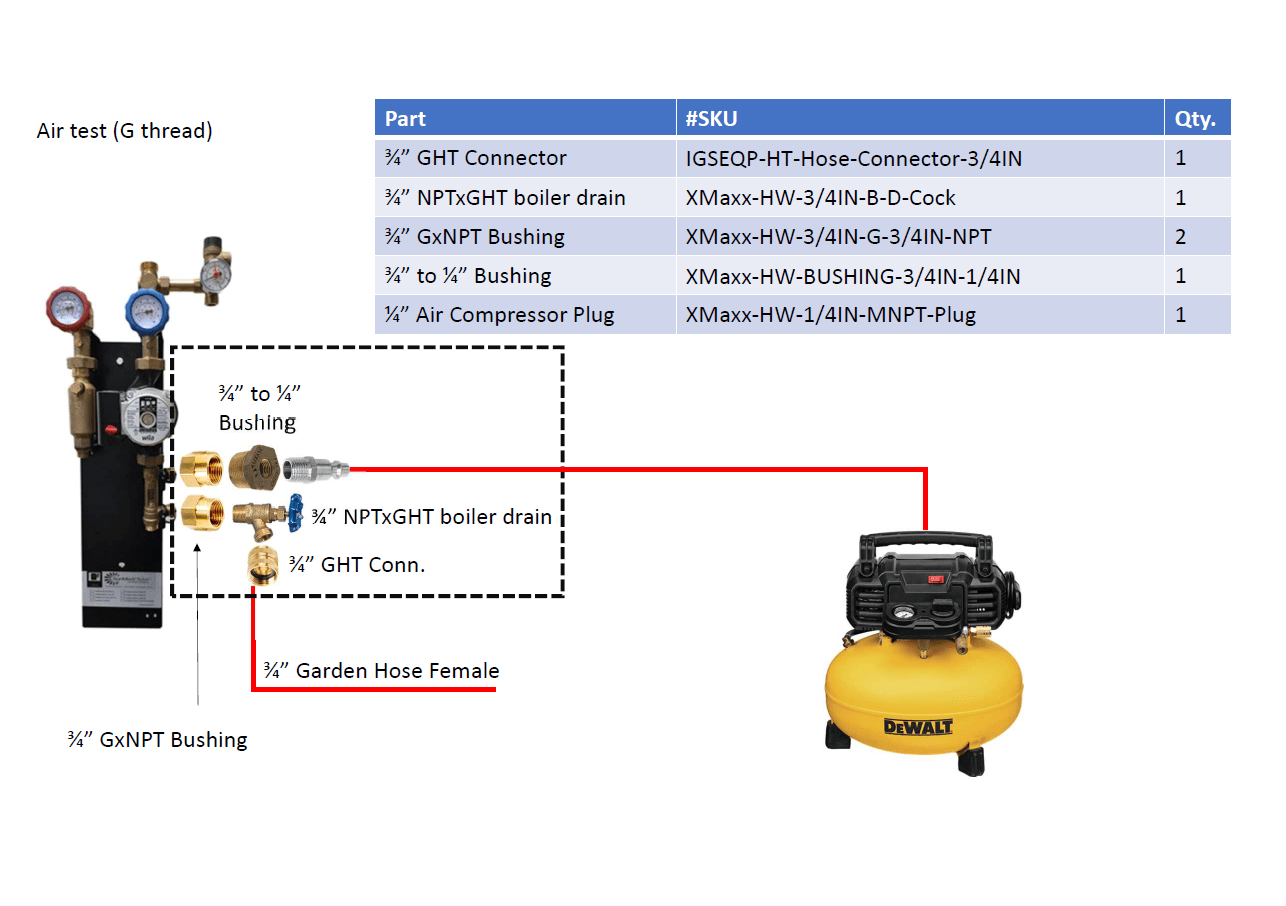
Air pressure testing


Parts in black box should be pre-assembled. Make sure you are using proper threading kit.
Pressure testing steps
- Before testing make sure system has no fluid inside - drain the system
- Connect Air Test Kit like on the schemes above
- Turn Flow Meter valve in horizontal position - allowing the air to go in via upper charging port
- Open upper and bottom charging port valves (black valves)
- Open boiler drain valve (connected to garden hose)
- Turn on the Air Compressor
- Wait a while for air to circulate in the system
- Close bottom drain port and boiler drain valves
- Build the pressure to 87 PSI
- Close upper charging port valve and turn off the Air Compressor
- Verify if no air leaks in the system
- When system does not loose pressure for 10 minutes Air Test is completed.
Can I Connect Existing Installation To The New Tank?
Yes you can. But we are recommending to use dedicated parts to our installations. All products can be easily connected using the SunMaxx Solar products. Moreover they we designed to different type of connections. Changing the parts and system installation may led to some problems or improper way of working the system. If it is not enough for you , call us we will help you.Can you install ports in the bottom of the tanks?
Installing the ports in the bottom parts is not recommended by SunMaxx Solar ™ . They are always installed in the top of the NP tank due to some reason. Firstly the water is filling the tank to determined level. Ports are located above the water surface - no leaking water from tank. Locating the ports in the bottom parts can cause the leaks and have to be well isolated. Moreover, parts for inslling can cost a huge amount of money. That all issues may lead to some problems, that SunMaxx Solar ™ install ports on the top locations.Charging the Solar Hot Water System
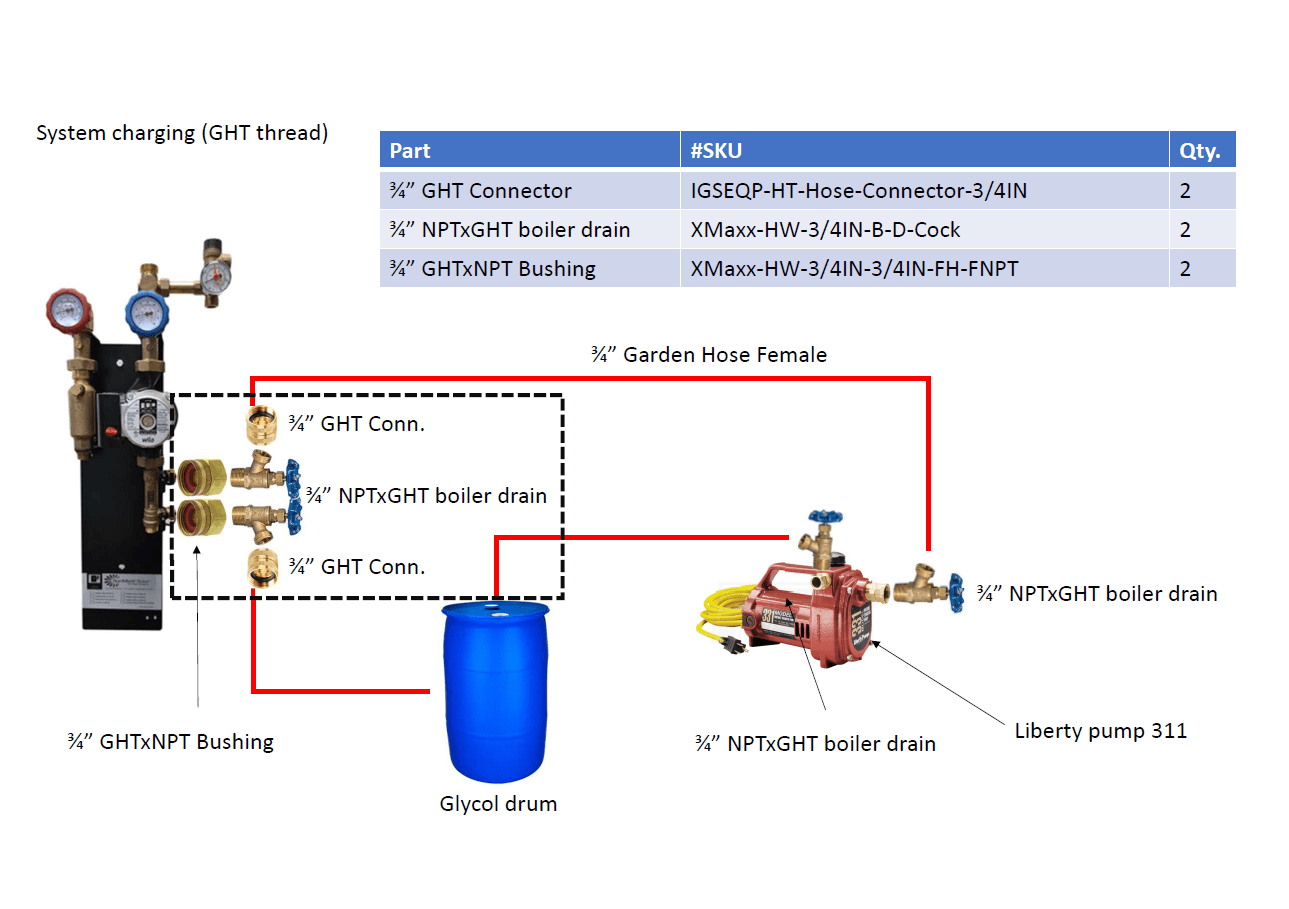
System charging kits schemes


Parts in black box should be pre-assembled. Make sure you are using proper threading kit.
System charging steps
- Makes sure air vents on roof are closed (or glycol will leak out).
- Prepare transfer pump, hoses, and glycol for charging of solar loop.
- You will need mixture of 50% glycol, 50% water. Approximately 0.5 gal per one collector.
- Connect discharge pump to top connection on solar pump station
- Connect return hose to glycol drum (from the bottom connection on solar pump station) .
- Prime transfer pump (make sure you have pressure).
- Open fill/flush port valves on pump station (black valves).
- Make sure flow meter valve is turned perpendicular to the valve body (this is fill mode).
- Turn the solar pump on in manual mode (usulally relay 1); which will turn on the solar pump.Make sure your red / blue temp gauges are not closed (they are open).
- Start transfer pump, build pressure until glycol returns from return hose into glycol drum.
- Make sure suction hose (from transfer pump) is installed below the water line in the glycol drum.
- If you have multiple collector banks; isolate the cold supply on the upper bank (lets the system fill the lower bank first. Let glycol run for 10‐15 minutes; most air should be purged out of the system (you will notice steady stream of glycol from the return line)
- Next, open the upper bank balancing valve and close the bottom bank, let run for 10‐15 minutes
- Open both valves on the collector banks.
- Begin to close the return valve on the fill/flush ports (this will allow for building of circulation loop pressure. Build pressure to 50+ PSI (as long as you have some flow coming out into the glycol drum).
- High pressure pushes the air out of the fluid.
- Bleed the air out of the air bleeding points (air vents in collectors, air vent on pump station, air vent on pump).
- Let system circulate at this pressure for 20‐30 minutes
- Close the fill/flush ports, turn off the transfer pump.
- Turn the flow meter valve to the verticle position; leave the pump in manual mode.
System charging videos
Charging setup
Charging procedure
Pump priming
Return hose
Flat Plate Air vent operation
Flat Plate Collector Compensator Installation
Flat Plate compensators preparation and interconnection
How can I check if my temperature sensor is working properly?
To check the temperature sensor you can use the digital multimeter tool and check the resistance of the sensor.A simple steps which allow to check the temperature sensor:- Turn the system off (electricity) - safety us the most important
- Open the controller box
- Check if the connection is not loose
- If loose fix the connection by pushing the sensor wire inside the terminal
- Close the controller box and check if that fixed the issue
- Check the sensor wire resistance with multimeter (turn the multimeter switch to the resistance measurement) – reading should be around 1.101 kOhm at room temperature and around 1.250 kOhm for hot water
- If readings are different sensor might need replacement
How can you use the tank in drain back applications?
The drain back tank are perfect solution for solar thermal system in the area where climate is challenging. That means extremely hot or cold temperatures. These tank allows all the water in the system (collector and piping) to drain into the tank reservoir. The water also protects the system form freezing and overheating. Below there is a the simplest scheme of the system with basic components.
